Use Firebase Emulator for Local Firestore Development
The Firebase Emulator is a great way to safely test your Firestore features without using the live Firebase environment. It helps reduce API costs and makes local development much faster and easier. Here’s a quick guide to get started.
Step 1: Install Firebase CLI
First, install the Firebase CLI globally. This tool lets you interact with Firebase from your terminal.
npm install -g firebase-tools
Check that it’s installed correctly:
firebase --version
Step 2: Create Your Repository
Create a new repository for your firebase emulator project where you’ll set up the Firebase Emulator.
mkdir firebase-emulator-project
cd firebase-emulator-project
Step 3: Login to Firebase
Log in to your Firebase account through the CLI to link your project.
firebase login
Step 4: Initialize the Emulator
Set up the emulator by running:
firebase init emulators
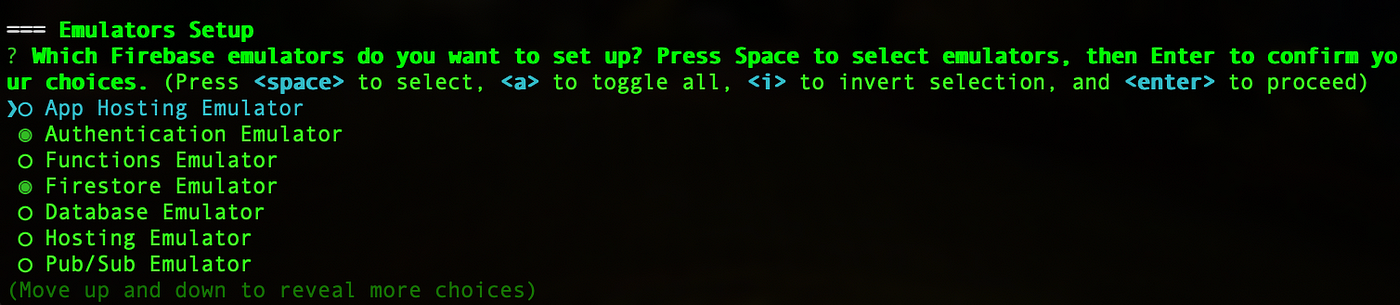
Here, choose the services you want to emulate, like Firestore.
Step 5: Update firebase.json
After initializing your project repository, update the firebase.json file to configure Firestore and Firebase Auth (used later to add data to Firestore), and enable the local Firebase Console UI:
{
  "emulators": {
    "singleProjectMode": true,
    "firestore": {
      "port": 8080
    },
    "auth": {
      "port": 9099
    },
    "ui": {
      "enabled": true,
      "port": 4000
    }
  }
}
Step 6: Start the Emulator
Start your local Firebase Emulator with:
firebase emulators:start
Open the Emulator UI
Open your browser and go to:
http://localhost:4000
You’ll see a local version of the Firebase console.
Connect Your React Native App
To connect your React Native app to the emulator, use this code:
import firestore from '@react-native-firebase/firestore';
firestore().useEmulator('localhost', 8080);
This routes Firestore requests to your local emulator.
Upload Sample Data to Firestore
Now, you might need to add data to your Firestore. Manually adding data through the UI can be time-consuming, so let’s upload data using a script. Use a script to upload sample data to your emulator.
Install the Firebase Admin SDK in your project.
npm install firebase-admin
To upload sample data to your Firestore emulator, you need to create a JSON file that represents the structure of your collections and documents. Here’s a quick breakdown:
- Collections: These are like folders that group related documents. In the JSON file, each collection is represented as a key.
- Documents: These are the individual records within a collection. Each document is represented by a unique key under its corresponding collection.
- Fields: Inside each document, you can have key-value pairs that store your data.
Here’s an example structure:
{
  "Collection1": {
    "DocumentId": {
      "key": "Value"
    }
  },
  "Collection2": {
    "DocumentId": {
      "key": "Value"
    }
  }
}
Now, let’s write a Node.js script that will use this firestore.json file to upload data to our local Firestore emulator.
const admin = require("firebase-admin");
const fs = require("fs");

admin.initializeApp({
  /* Since the emulator runs locally, we are using the default
   authentication setup. For this, we configure the Auth
   emulator in the firebase.json file. */
  credential: admin.credential.applicationDefault(),
  projectId: "project-id", // replace it with your firebase project id
});

const firestore = admin.firestore();
const data = JSON.parse(fs.readFileSync("firestore.json", "utf8"));

async function uploadData() {
  for (const [collectionName, documents] of Object.entries(data)) {
    const collectionRef = firestore.collection(collectionName);
    for (const [docId, docData] of Object.entries(documents)) {
      await collectionRef.doc(docId).set(docData);
      console.log(
        `Uploaded document: ${docId} to collection: ${collectionName}`
      );
    }
  }
}

uploadData()
.then(() => {
  console.log("Data upload complete!");
  process.exit(0);
})
.catch((error) => {
  console.error("Error uploading data:", error);
  process.exit(1);
});
Run the script:
node uploadFirestoreData.js
Export and Import Data to Avoid Re-uploading
Uploading data again every time you start a new session isn’t ideal. Instead, let’s export the current data when the session ends and re-import it when you start the emulator again later. This way, you’ll save time and maintain consistency across sessions. To save your emulator data between sessions, use:
firebase emulators:start --import=./dir --export-on-exit
This keeps your data from being wiped out when you stop the emulator.
Why Use the Firebase Emulator?
- Safe Testing: Avoid risks to your live project.
- Faster Development: See changes instantly.
- Offline Mode: Work without an internet connection.
- Save Costs: Reduce API calls and save money.
Using the emulator makes your development process smoother and more efficient. Happy coding!
Loved this article?
Hit the like button
Share this article
Spread the knowledge
More from the world of Cars24
No Human in the Loop: Cars24's First AI Loan Workflow
What it takes to ship AI that owns a workflow end to end
How a non-engineer built the tool 1000+ people at Cars24 now use
Story of how an autonaut noticed a problem, brainstormed it with Claude, learned Cloudflare in three days & shipped a tool 1000+ people now use
Analytics should drive decisions, not describe them
How we stopped burning thirty hours a week on “what happened” and started using that time to decide the future